Installing a 24V actuator in a confined space can be a challenging yet rewarding task. As a 24V Actuator supplier, I have witnessed firsthand the importance of proper installation techniques to ensure optimal performance and longevity of these devices. In this blog post, I will share some valuable insights and step-by-step guidance on how to successfully install a 24V actuator in a confined space.
Understanding the 24V Actuator
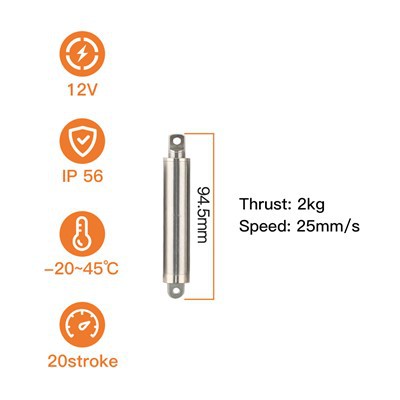
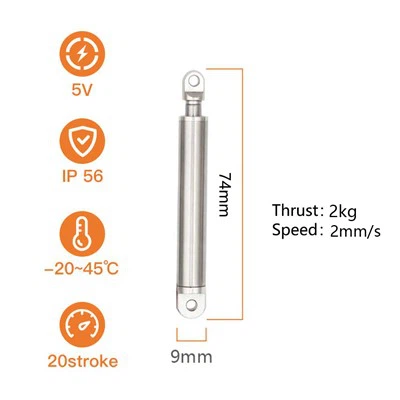
Before diving into the installation process, it's crucial to have a clear understanding of what a 24V actuator is and how it works. A Actuator 24V is a device that converts electrical energy into mechanical motion. It is commonly used in various applications, including industrial machinery, automotive systems, and home automation. The 24V power supply provides a reliable and consistent source of energy to drive the actuator's movement.
Assessing the Confined Space
The first step in installing a 24V actuator in a confined space is to assess the available space thoroughly. Measure the dimensions of the area where the actuator will be installed, including the length, width, and height. Pay close attention to any obstacles, such as pipes, wires, or other components, that may interfere with the installation process. It's also important to consider the accessibility of the space for future maintenance and repairs.
Selecting the Right Actuator
Once you have assessed the confined space, the next step is to select the right 24V actuator for your application. Consider factors such as the required force, stroke length, speed, and mounting options. Make sure the actuator is compatible with the available power supply and control system. If you're unsure which actuator is best suited for your needs, consult with a professional or refer to the manufacturer's specifications.
Preparing the Installation Area
Before installing the actuator, it's essential to prepare the installation area properly. Clean the surface where the actuator will be mounted to remove any dirt, debris, or grease. Ensure that the surface is flat and level to prevent any misalignment or binding during operation. If necessary, use a drill or other tools to create mounting holes or brackets for the actuator.


Mounting the Actuator
Once the installation area is prepared, it's time to mount the actuator. Follow the manufacturer's instructions carefully to ensure proper installation. Use the appropriate mounting hardware, such as bolts, nuts, or screws, to secure the actuator to the mounting surface. Make sure the actuator is aligned correctly and tightened securely to prevent any movement or vibration during operation.
Connecting the Power Supply
After mounting the actuator, the next step is to connect the power supply. Make sure the power supply is compatible with the actuator's voltage and current requirements. Use the appropriate wiring and connectors to connect the actuator to the power supply. Follow the manufacturer's wiring diagram carefully to ensure proper connection and polarity. It's also important to use a suitable fuse or circuit breaker to protect the actuator from overcurrent or short circuits.
Connecting the Control System
In addition to the power supply, the actuator also needs to be connected to a control system. The control system can be a simple switch or a more complex programmable logic controller (PLC). Make sure the control system is compatible with the actuator's control signals and functions. Use the appropriate wiring and connectors to connect the actuator to the control system. Follow the manufacturer's wiring diagram carefully to ensure proper connection and communication.
Testing the Actuator
Once the actuator is installed and connected to the power supply and control system, it's time to test it. Before testing, make sure the actuator is in a safe position and that all safety precautions are in place. Turn on the power supply and activate the control system to test the actuator's movement. Check for any abnormal noises, vibrations, or movements. If any issues are detected, stop the test immediately and troubleshoot the problem.
Troubleshooting Common Issues
During the installation and testing process, you may encounter some common issues with the 24V actuator. Here are some troubleshooting tips to help you resolve these issues:
- No movement: Check the power supply, wiring, and connectors to ensure proper connection and voltage. Make sure the control system is sending the correct signals to the actuator.
- Abnormal noises or vibrations: Check the actuator's mounting to ensure it is secure and aligned correctly. Inspect the actuator's internal components for any signs of damage or wear.
- Overheating: Check the power supply and wiring to ensure proper voltage and current. Make sure the actuator is not overloaded or operating in a high-temperature environment.
- Slow or inconsistent movement: Check the actuator's lubrication to ensure it is properly lubricated. Inspect the actuator's internal components for any signs of damage or wear.
Maintenance and Care
To ensure the long-term performance and reliability of the 24V actuator, it's important to perform regular maintenance and care. Here are some maintenance tips to help you keep your actuator in good condition:
- Clean the actuator regularly: Use a clean, dry cloth to remove any dirt, debris, or grease from the actuator's exterior. Avoid using abrasive materials or solvents that may damage the actuator's surface.
- Lubricate the actuator periodically: Follow the manufacturer's recommendations for lubrication intervals and use the appropriate lubricant. Make sure to apply the lubricant evenly to all moving parts.
- Inspect the actuator for damage or wear: Regularly inspect the actuator's internal and external components for any signs of damage or wear. Replace any damaged or worn parts immediately to prevent further damage or failure.
- Store the actuator properly: If the actuator is not in use, store it in a clean, dry place away from direct sunlight and moisture. Make sure to protect the actuator from dust, dirt, and other contaminants.
Conclusion
Installing a 24V actuator in a confined space requires careful planning, preparation, and execution. By following the steps outlined in this blog post, you can ensure a successful installation and optimal performance of your actuator. Remember to select the right actuator for your application, prepare the installation area properly, mount the actuator securely, connect the power supply and control system correctly, test the actuator thoroughly, troubleshoot any issues, and perform regular maintenance and care.
If you have any questions or need further assistance with installing a 24V actuator in a confined space, please don't hesitate to contact us. As a leading 24V Actuator supplier, we have the expertise and experience to help you find the right solution for your needs. We also offer a wide range of 12V Actuator Motor and other related products to meet your specific requirements. Contact us today to learn more about our products and services and to discuss your procurement needs.
References
- Manufacturer's installation and operation manuals
- Industry standards and best practices for actuator installation and maintenance
- Technical articles and resources on actuator technology and applications