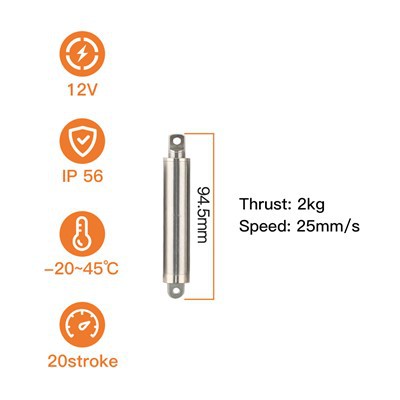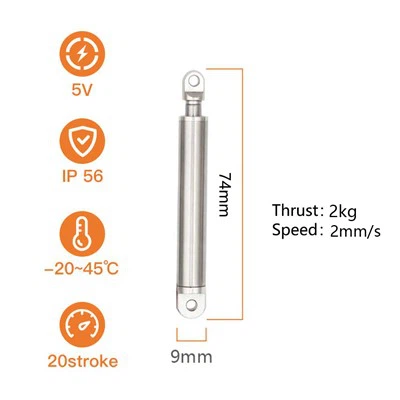
As a trusted supplier of fast electric actuators, I understand the importance of proper installation to ensure optimal performance and longevity of these essential components. In this blog post, I will guide you through the step-by-step process of correctly installing a fast electric actuator, providing valuable insights and practical tips along the way.
1. Pre-Installation Preparation
Before you begin the installation process, it is crucial to gather all the necessary tools and materials. This includes a set of wrenches, screwdrivers, measuring tape, and a level. Additionally, make sure you have the actuator itself, along with any mounting brackets, hardware, and electrical cables provided by the manufacturer.
Inspect the actuator carefully for any signs of damage or defects. Check the housing, motor, gears, and shaft for any visible cracks, dents, or misalignments. If you notice any issues, contact the manufacturer immediately for assistance.
Next, review the installation manual provided by the manufacturer. Familiarize yourself with the specific requirements and instructions for your particular actuator model. Pay close attention to any safety precautions, torque specifications, and wiring diagrams.
2. Mounting the Actuator
The first step in the installation process is to mount the actuator in the desired location. Choose a stable and secure surface that can support the weight and forces exerted by the actuator during operation. The mounting surface should be flat, clean, and free of any debris or obstructions.
If the actuator comes with mounting brackets, attach them to the actuator using the provided hardware. Make sure the brackets are securely fastened and aligned properly. Use a level to ensure that the actuator is mounted horizontally or vertically, depending on the application.
Once the brackets are attached, position the actuator on the mounting surface and align the holes in the brackets with the corresponding holes in the surface. Insert the mounting bolts through the holes and tighten them using a wrench. Make sure the bolts are tightened to the specified torque value to prevent any loosening or movement during operation.
3. Connecting the Electrical Cables
After the actuator is mounted, the next step is to connect the electrical cables. Before you begin, make sure the power supply is turned off to avoid any electrical shock or damage.
Locate the electrical connection box on the actuator. Open the box and identify the terminals for the power supply, control signals, and feedback sensors. Refer to the wiring diagram in the installation manual to ensure that you connect the cables correctly.
Connect the power supply cables to the appropriate terminals in the connection box. Make sure the cables are securely fastened and insulated to prevent any short circuits or electrical hazards. Use wire nuts or crimp connectors to join the cables together, and cover the connections with electrical tape or heat shrink tubing for added protection.
Next, connect the control signal cables to the corresponding terminals in the connection box. These cables are used to send commands to the actuator, such as start, stop, and speed control. Make sure the cables are properly shielded to minimize any interference or noise.
Finally, connect the feedback sensor cables to the appropriate terminals in the connection box. These cables are used to provide information about the position, speed, and force of the actuator to the control system. Make sure the sensors are calibrated and adjusted correctly to ensure accurate feedback.
4. Testing the Actuator
Once the electrical cables are connected, it is time to test the actuator to ensure that it is functioning properly. Before you turn on the power supply, double-check all the connections to make sure they are secure and correct.
Turn on the power supply and activate the control system. Send a test command to the actuator to make it move. Observe the actuator's movement and listen for any unusual noises or vibrations. If the actuator does not move or if you notice any problems, turn off the power supply immediately and check the connections and settings.
If the actuator moves smoothly and without any issues, perform a series of tests to verify its performance. This may include testing the actuator's speed, force, and accuracy. Use a measuring device, such as a caliper or a force gauge, to measure the actuator's movement and force output. Compare the measured values with the specifications provided by the manufacturer to ensure that the actuator is operating within the acceptable range.
5. Adjusting the Actuator
After testing the actuator, you may need to make some adjustments to optimize its performance. This may include adjusting the speed, force, and position settings of the actuator. Refer to the installation manual or the manufacturer's instructions for specific guidance on how to make these adjustments.
To adjust the speed of the actuator, you may need to adjust the voltage or current supplied to the motor. This can be done using a variable resistor or a speed controller. Make small adjustments at a time and test the actuator after each adjustment to ensure that the speed is within the desired range.
To adjust the force output of the actuator, you may need to adjust the torque limit or the pressure setting. This can be done using a torque limiter or a pressure relief valve. Make sure to follow the manufacturer's instructions carefully when making these adjustments to avoid any damage to the actuator.
To adjust the position of the actuator, you may need to adjust the limit switches or the position sensors. This can be done by moving the switches or sensors to the desired position and securing them in place. Make sure to calibrate the sensors after making any adjustments to ensure accurate position feedback.
6. Maintenance and Troubleshooting
Once the actuator is installed and adjusted, it is important to perform regular maintenance to ensure its continued performance and reliability. This may include cleaning the actuator, lubricating the moving parts, and checking the electrical connections.


Clean the actuator regularly to remove any dirt, dust, or debris that may accumulate on the surface. Use a soft cloth or a brush to clean the actuator, and avoid using any abrasive or corrosive materials.
Lubricate the moving parts of the actuator, such as the gears, bearings, and shafts, to reduce friction and wear. Use a lubricant recommended by the manufacturer, and apply it according to the specified intervals and amounts.
Check the electrical connections regularly to make sure they are secure and free of any corrosion or damage. Tighten any loose connections, and replace any damaged cables or connectors.
If you encounter any problems or issues with the actuator, refer to the troubleshooting section of the installation manual or contact the manufacturer's technical support team for assistance. They can provide you with guidance on how to diagnose and fix the problem, and may also offer replacement parts or repair services if necessary.
Conclusion
Installing a fast electric actuator correctly is essential to ensure its optimal performance and longevity. By following the steps outlined in this blog post, you can install your actuator safely and effectively, and avoid any potential problems or issues.
If you have any questions or need further assistance with the installation or operation of your fast electric actuator, please do not hesitate to contact us. As a leading supplier of Actuators Electric, we are committed to providing our customers with high-quality products and excellent customer service. We offer a wide range of Long Stroke Electric Linear Actuator and Electric Linear Actuator 6V to meet your specific needs and requirements. Contact us today to learn more about our products and services, and to discuss your procurement options.
References
- Manufacturer's installation manual
- Industry standards and guidelines for electric actuator installation