For LEGO model enthusiasts, electric actuators are crucial components for making their models "animate." Whether building a mech hatch that opens and closes, a crane boom that raises and lowers, or a retractable robot arm, choosing the right electric actuator ensures both functionality and aesthetic appeal. When selecting, focus on four key factors: size compatibility, power matching, user-friendly operation, and compatibility. Consider the specific characteristics of the LEGO model (such as the miniature setting, mechanical structure, and interactive requirements) to refine your selection criteria. The details are as follows:
Prioritize "Size and Installation": Adapting to the miniaturization requirements of LEGO models.
LEGO models (especially Technic and Technic sets) are compact, and the size of electric actuators directly determines their smooth integration. Key considerations include:
1. Physical Size: Fitting into the "modular space" of LEGO bricks.
Length (collapsed/extended):
LEGO models' mechanical structures are often designed based on "brick units" (1 LEGO unit ≈ 8mm). Electric actuators must be able to fit within the brick framework. For example:
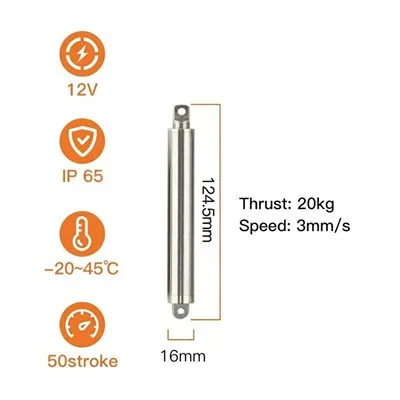
When building the tailgate opening and closing mechanism of a 1:24 scale car, it's best to use a micro electric actuator (such as a 12mm diameter linear actuator) with a retracted length ≤ 50mm and an extended length ≤ 80mm to avoid protruding from the vehicle's contours.
For a large LEGO robotic arm (such as a 1-meter-tall mecha model), the retracted length can be relaxed to 100-150mm, but ensure that the extended length does not affect the overall proportions of the model.
2. Installation Method: Compatible with LEGO's "Tool-Free Assembly" Principle
Interface Compatibility:
Preferably choose actuators with built-in "LEGO-compatible interfaces"-for example, models with M3 threaded holes on both ends, which can be directly secured with LEGO Technic pins or bushings. Alternatively, choose actuators with plastic clips (such as those custom-made for LEGO by some brands) that snap directly into the nubs/grooves of LEGO bricks without the need for additional drilling or gluing.
Mounting Freedom:
If the model requires multi-angle movement (such as rotation and extension of a robot wrist), it is recommended to choose a push rod with "rotatable ends" (such as a ball-jointed model) to avoid mechanical stalls caused by fixed mounting angles (for example, deformation of the Lego structure when the push rod is extended).
Precise Matching of "Power and Speed": Matching the Functional Scenario of the Lego Model
The power requirements of Lego models are far lower than those of industrial applications, so high loads are not necessary. The key is to ensure sufficient power to drive the structure and a speed that meets the scenario's logic. Three parameters should be considered: load, speed, and voltage:
1. Load: Focus on "being able to drive the Lego structure" to avoid excessive power
Key Principle: The load does not need to be too high; it only needs to be sufficient to overcome the friction of the Lego mechanical structure. Load references for different scenarios:
Lightweight scenarios (such as hatch opening and closing, raising and lowering a small antenna): Choose a 5-20N actuator (1N ≈ 0.1kg load capacity). For example, to actuate a LEGO plastic hatch (weighing approximately 50g), a 5N load is sufficient.
Medium-weight scenarios (such as crane booms and robotic arms): Choose a 20-50N actuator. For example, to actuate a 100-piece LEGO boom (weighing approximately 300g), a 20N load prevents the boom from sagging or stalling.
Avoid actuators > 50N: Excessive loads may cause LEGO bricks (especially plastic pins and beams) to break under stress, damaging the model structure.
2. Speed: Conform to the model's "real-world scenario logic."
Prioritize low speed to avoid jerky movements.
The appeal of LEGO models lies in their "simulation of real-world mechanical motion." Excessive speeds can lose detail. For example:
Mech hatch opening and closing: Recommended speed: 0.5-2mm/s, to simulate the "slow opening" ritual of a real hatch;
Crane boom raising and lowering: Speed: 1-3mm/s, to avoid destabilizing the model's center of gravity due to rapid boom raising and lowering;
For special scenarios (such as "ejection structures" and "rapidly opening and closing gates"), speeds of 3-5mm/s are acceptable, but a buffer structure (such as a LEGO spring) is required to prevent impact.
3. Voltage: Compatible with common LEGO power supplies to simplify power supply
Prioritize low-voltage actuators of 12V or less:
Common power supplies for LEGO models include the "LEGO Power Functions Battery Pack" (6V), the "Boost Programmable Battery" (7.4V), or third-party USB power modules (5V). Selecting 5V/6V/12V actuators allows for direct compatibility without the need for a separate voltage converter (which increases the model size and circuit complexity). For example: 5V push rods can be connected directly to the LEGO USB power module, while 6V push rods can be used with the Power Functions battery pack. There's no need to worry about voltage mismatches causing push rod burnout or insufficient power.
Focus on "Control and Compatibility": Reducing the Difficulty of LEGO Model Integration
LEGO enthusiasts (especially beginners) don't need complex programming or circuit knowledge. Choosing push rods that are "easy to control and highly compatible" can reduce integration costs. Key considerations:
1. Control Method: Compatible with LEGO's "Modular Control"
Prioritize "Wireless/Button Control" to avoid complex wiring.
For convenience: Push rods can be controlled by pressing a button, eliminating the need for manual wiring.
For programming enthusiasts (such as those using LEGO Mindstorms EV3 or SPIKE Prime): Choose push rods with "PWM Signal Control." These can be directly connected to the motor port on the LEGO main controller. Using graphical programming tools (such as Scratch), you can set the push rod's extension and retraction speed and direction, achieving "automated actions" (for example, making a robot arm extend and retract along a set trajectory). Avoid using "industrial-grade controllers": PLC controllers and specialized driver boards commonly used in industrial actuators are bulky and complex to operate, making them unsuitable for the lightweight requirements of LEGO models.
Focus on "Safety and Cost-Effectiveness": Suitable for Hobbyist Use
1. Safety: Avoid Damage to LEGO Models or Potential Safety Hazards
Choose a Putter with "Overload Protection":
LEGO plastic structures have limited load-bearing capacity. When a pusher encounters resistance (such as being stuck by a brick), overload protection automatically shuts down (e.g., shuts off the power when the current is too high), preventing the pusher from continuously exerting force and causing breakage of the LEGO beam or deformation of the pin.
Pitfalls to Avoid: Three Common Mistakes Beginners Make
1.Don't Blindly Pursue "High Specifications": For example, choosing a 50N pusher for a small hatch is not only bulky but could also damage the LEGO structure due to excessive force.
2.Ignoring "Travel Matching": If the pusher's stroke is smaller than the model's required range of motion (e.g., selecting a 30mm stroke for a 40mm lift), the movement will not be completed.
3.Ignoring "Power Supply Compatibility": Directly connecting a 12V pusher to a 6V LEGO battery will result in insufficient voltage and power loss. A 24V power supply may burn out the actuator.